> ## Documentation Index
> Fetch the complete documentation index at: https://docs-dev-actions-triggers-prototype.mintlify.site/llms.txt
> Use this file to discover all available pages before exploring further.
> Auth0 Configuration for the Server + API architecture scenario
# Auth0 Configuration (Server Apps + API)
In this section, we will review ExampleCo's configurations using the [Auth0 Dashboard](https://manage.auth0.com/#).
## Configure the API
To protect an API, you must register an API using the Auth0 Dashboard. Follow instructions on [Register APIs](/docs/get-started/auth0-overview/set-up-apis) to configure the Timesheets API.
### JSON Web Token Profile
OAuth 2.0 defines the type of profiles, or dialects, for an access token. Auth0 supports two different profiles:
* Auth0 token profile
* RFC 9068 profile
The default is the Auth0 profile. The main difference between these two profiles is the difference in claim names. The Auth0 profile uses `azp` rather than `client_id`. You can learn more about the differences by reading [Access Token Profiles](/docs/secure/tokens/access-tokens/access-token-profiles).
### Signing Algorithms
When you create an API, you must select the algorithm with which your tokens will be signed. The signature is used to verify that the sender of the JWT is who it says it is and to ensure that the message hasn't been changed along the way.
The signature is part of a JWT. If you are unfamiliar with JWT structure, please see [JSON Web Token Structure](/docs/secure/tokens/json-web-tokens/json-web-token-structure).
To create the signature, you must take the encoded header, the encoded payload, a secret, the algorithm specified in the header, and sign that. That algorithm, which is part of the JWT header, is the one you select for your API: `HS256,` `RS256,` or `PS256`.
The most secure practice, and our recommendation, is to use **RS256**. Some of the reasons are:
* With RS256, you are sure that only the holder of the private key (Auth0) can sign tokens, while anyone can check if the token is valid using the public key.
* Under HS256, if the private key is compromised you would have to re-deploy the API with the new secret. With RS256, you can request a token that is valid for multiple audiences.
* With RS256, you can implement key rotation without having to re-deploy the API with the new secret.
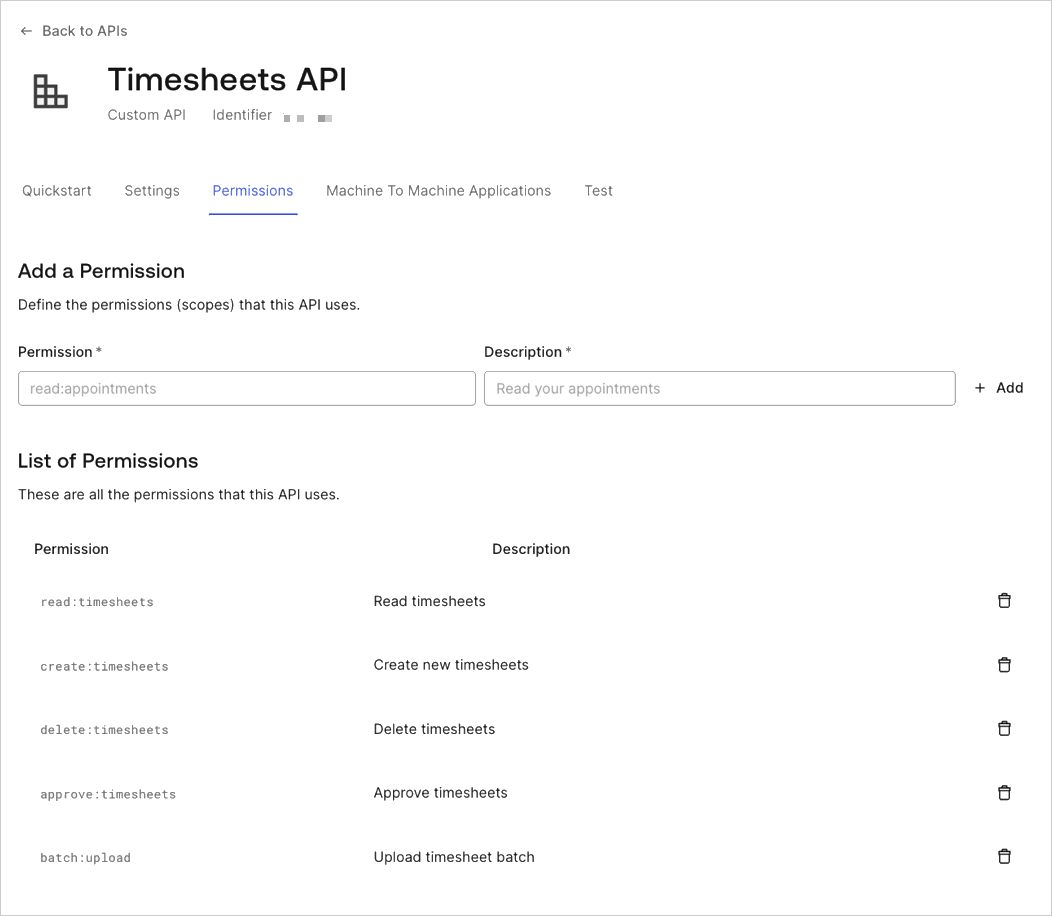
## Configure the Scopes
In the settings for your API, you will need to configure the Scopes that applications can request during authorization. Navigate to the Permissions tab.
In this section, you can add all four of the scopes discussed before: `batch:upload`, `read:timesheets`, `create:timesheets`, `delete:timesheets`, and `approve:timesheets`. Also add an additional scope: `batch:upload`.
For the purpose of this document, we will only be concerned with the `batch:upload` scope because that is all that is required by the cron job. However, for the sake of completeness, we are adding the necessary scopes which will be required by future applications.
 ## Create the Application
When creating an API in the Auth0 Dashboard, a test application for the API will automatically be generated. In the Auth0 Dashboard, navigate to the [Application Section](https://manage.auth0.com/#/applications), and you will see the test application for the Timesheets API.
## Create the Application
When creating an API in the Auth0 Dashboard, a test application for the API will automatically be generated. In the Auth0 Dashboard, navigate to the [Application Section](https://manage.auth0.com/#/applications), and you will see the test application for the Timesheets API.
 Go to the settings for the application by selecting the menu option at the end. Rename the application to `Timesheets Import Job`.
For the cron job, you will need a Machine-to-Machine Application. The test application that was generated when the API was created was automatically configured as a Machine-to-Machine Application.
## Configure Application's access to the API
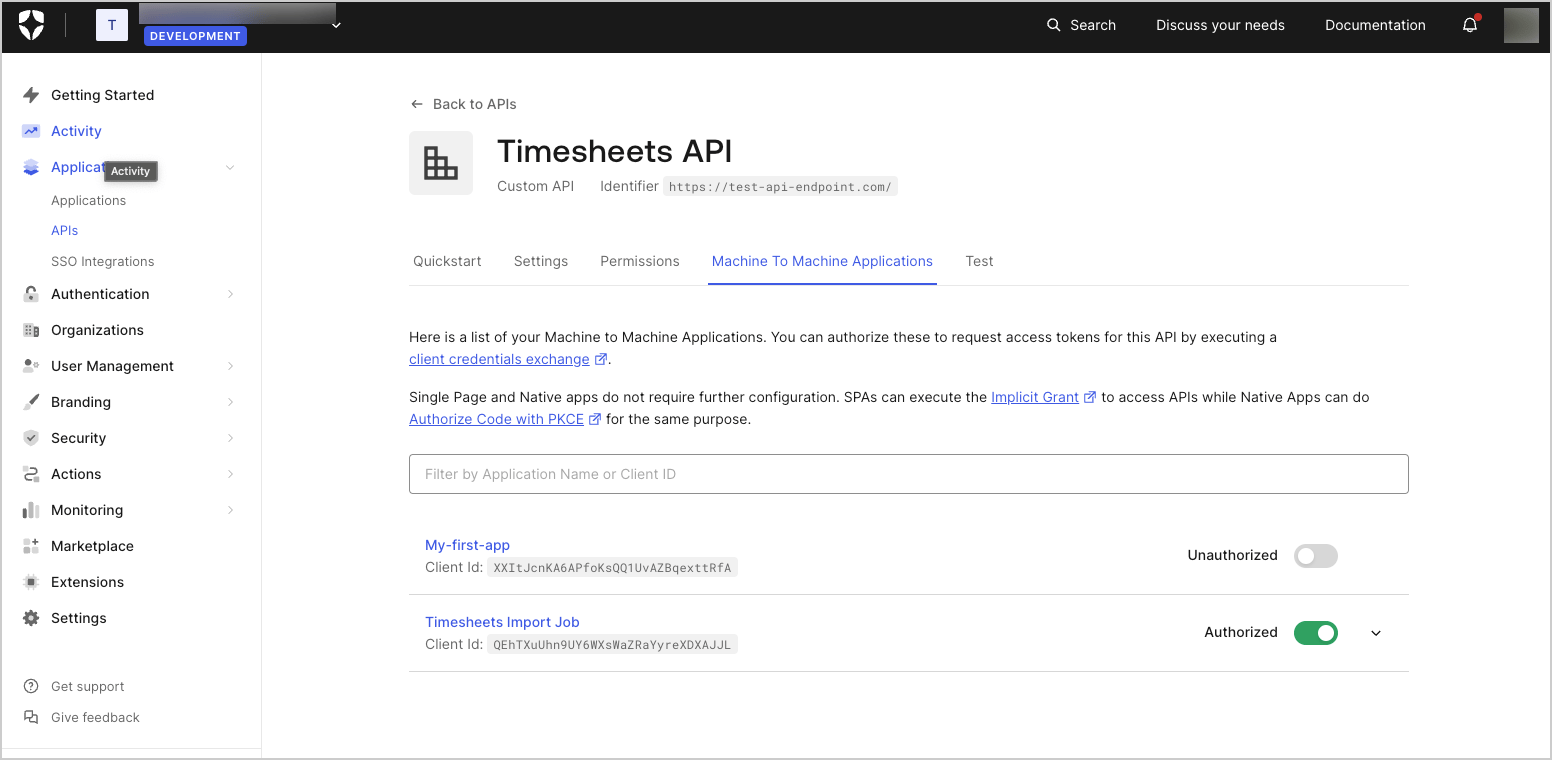
Finally, you must allow the application access to the Timesheets API. Go back to the configuration of the API, and select the Machine to Machine Application tab.
You will see the **Timesheets Import Job** application listed, and it should have access to API as can be seen from the switch to the right of the application name which indicates a value of `Authorized`. If it does not indicate that the application is authorized, simply toggle the value of the switch from `Unauthorized` to `Authorized`.
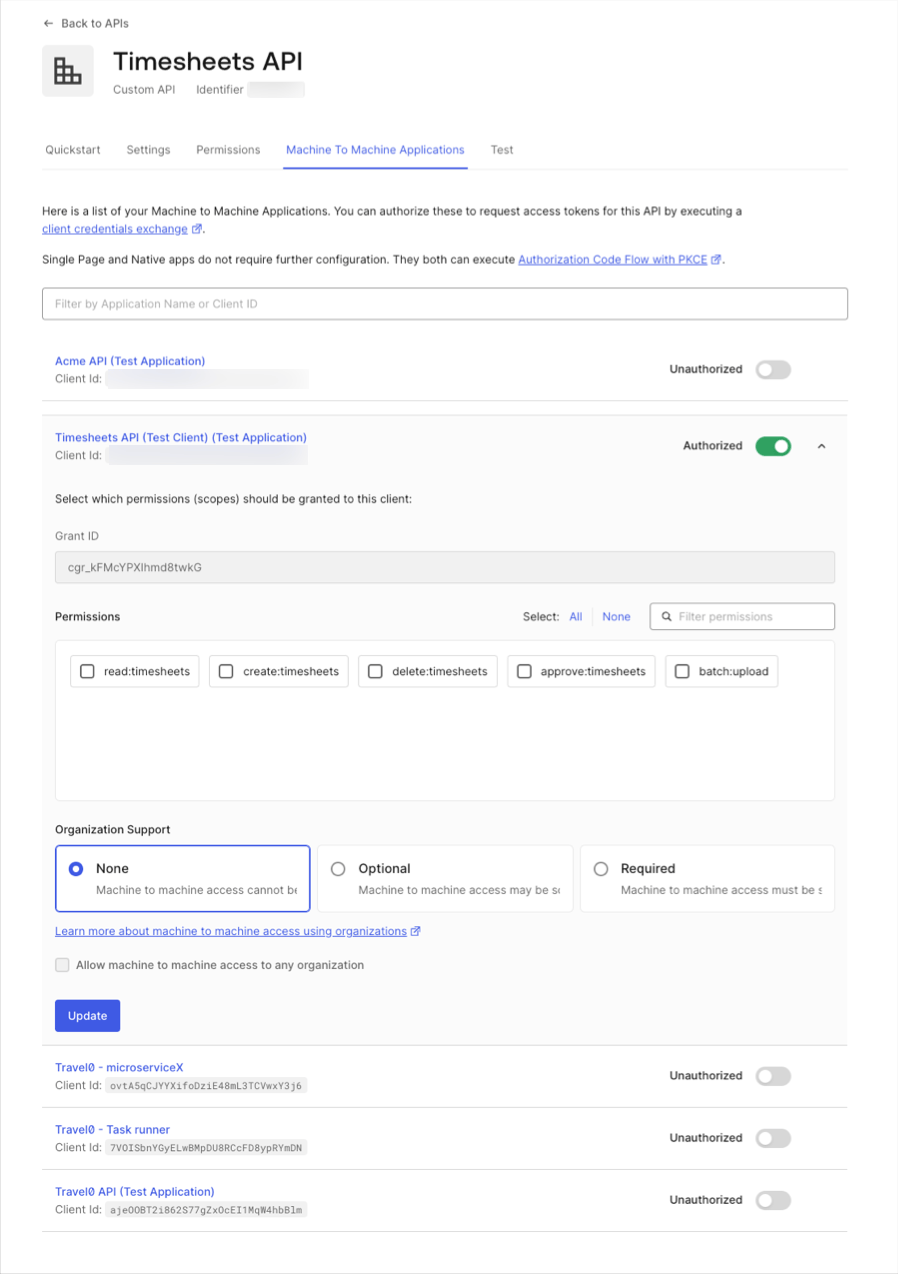
You will also need to specify which scopes will be included in access tokens that are issued to the application when the application authorizes with Auth0.
Expand the settings for the application by clicking on the down arrow to the far right, and you will see the list of available scopes. The cron job will only require the `batch:upload` scope as it will simply create new timesheets based on the timesheet entries in the external system.
Once you have selected the `batch:upload` scope, save the settings by clicking the **Update** button.
Go to the settings for the application by selecting the menu option at the end. Rename the application to `Timesheets Import Job`.
For the cron job, you will need a Machine-to-Machine Application. The test application that was generated when the API was created was automatically configured as a Machine-to-Machine Application.
## Configure Application's access to the API
Finally, you must allow the application access to the Timesheets API. Go back to the configuration of the API, and select the Machine to Machine Application tab.
You will see the **Timesheets Import Job** application listed, and it should have access to API as can be seen from the switch to the right of the application name which indicates a value of `Authorized`. If it does not indicate that the application is authorized, simply toggle the value of the switch from `Unauthorized` to `Authorized`.
You will also need to specify which scopes will be included in access tokens that are issued to the application when the application authorizes with Auth0.
Expand the settings for the application by clicking on the down arrow to the far right, and you will see the list of available scopes. The cron job will only require the `batch:upload` scope as it will simply create new timesheets based on the timesheet entries in the external system.
Once you have selected the `batch:upload` scope, save the settings by clicking the **Update** button.
 Now that we have designed our solution and discussed the configurations needed on Auth0's side, we can proceed with the implementation.