> ## Documentation Index
> Fetch the complete documentation index at: https://docs-dev-actions-triggers-prototype.mintlify.site/llms.txt
> Use this file to discover all available pages before exploring further.
> How to authenticate and authorize a Tessel device with Auth0.
# Authenticating & Authorizing a Tessel device with Auth0
export const AuthCodeBlock = ({filename, icon, language, highlight, children}) => {
const [displayText, setDisplayText] = useState(children);
const [copyText, setCopyText] = useState(children);
const wrapperRef = React.useRef(null);
useEffect(() => {
let unsubscribe = null;
function init() {
if (!window.autorun || !window.rootStore) {
return;
}
unsubscribe = window.autorun(() => {
let processedChildrenForDisplay = children;
let processedChildrenForCopy = children;
for (const [key, value] of window.rootStore.variableStore.values.entries()) {
const escapedKey = key.replaceAll(/[.*+?^${}()|[\]\\]/g, (String.raw)`\$&`);
let displayValue = value;
if (key === "{yourClientSecret}" && value !== "{yourClientSecret}") {
displayValue = value.substring(0, 3) + "*****MASKED*****";
}
processedChildrenForDisplay = processedChildrenForDisplay.replaceAll(new RegExp(escapedKey, "g"), displayValue);
processedChildrenForCopy = processedChildrenForCopy.replaceAll(new RegExp(escapedKey, "g"), value);
}
setDisplayText(processedChildrenForDisplay);
setCopyText(processedChildrenForCopy);
});
}
if (window.rootStore) {
init();
} else {
window.addEventListener("adu:storeReady", init);
}
return () => {
window.removeEventListener("adu:storeReady", init);
unsubscribe?.();
};
}, [children]);
useEffect(() => {
if (!wrapperRef.current) return;
const originalWriteText = navigator.clipboard.writeText.bind(navigator.clipboard);
let isOverriding = false;
const handleClick = e => {
const button = e.target.closest('[data-testid="copy-code-button"]');
if (!button || !wrapperRef.current.contains(button)) return;
isOverriding = true;
navigator.clipboard.writeText = text => {
if (isOverriding) {
isOverriding = false;
navigator.clipboard.writeText = originalWriteText;
return originalWriteText(copyText);
}
return originalWriteText(text);
};
setTimeout(() => {
if (isOverriding) {
isOverriding = false;
navigator.clipboard.writeText = originalWriteText;
}
}, 100);
};
const wrapper = wrapperRef.current;
wrapper.addEventListener('click', handleClick, true);
return () => {
wrapper.removeEventListener('click', handleClick, true);
if (navigator.clipboard.writeText !== originalWriteText) {
navigator.clipboard.writeText = originalWriteText;
}
};
}, [copyText]);
return
{displayText}
;
};
[Tessel](https://tessel.io) is an amazing board. Not only it has a great hardware spec and a great extensibility story, you can program it in Javascript! When it was announced on Kickstarter we immediately supported it and waited long weeks to get hold of one.
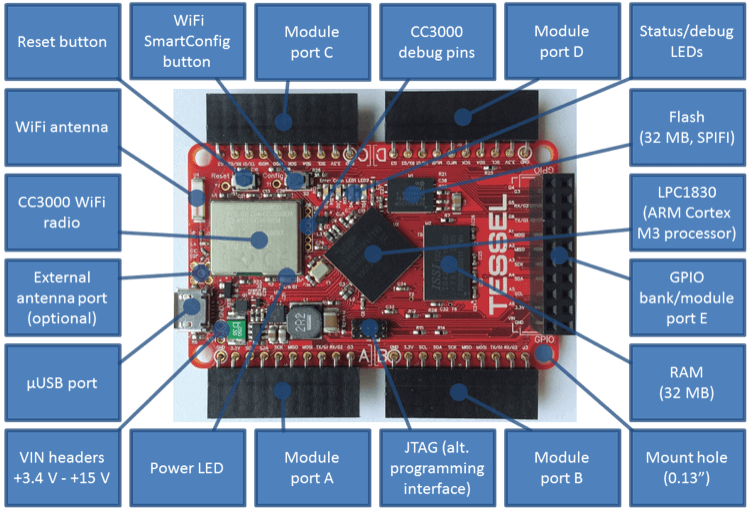 It finally arrived we can write our first program: get a token from Auth0 and call an API.
Tessel aims for full compatibility with Javascript. Most of core Node modules also work, but not all of them. See [the Tessle docs in Github](https://github.com/tessel/docs/blob/master/compatibility.md) for more details.
## The sample
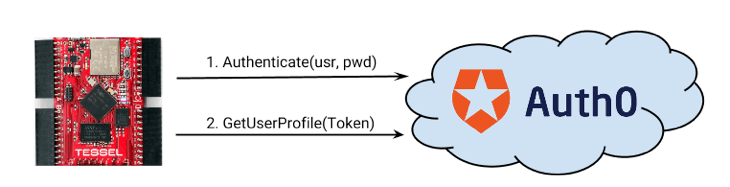
This example is straight-forward:
1. We call the Resource Owner endpoint on Auth0 with device credentials
2. Get a token back
3. We use the token to call an API
It finally arrived we can write our first program: get a token from Auth0 and call an API.
Tessel aims for full compatibility with Javascript. Most of core Node modules also work, but not all of them. See [the Tessle docs in Github](https://github.com/tessel/docs/blob/master/compatibility.md) for more details.
## The sample
This example is straight-forward:
1. We call the Resource Owner endpoint on Auth0 with device credentials
2. Get a token back
3. We use the token to call an API
 export const codeExample = `var http = require('https');
var tessel = require('tessel');
tessel.syncClock(function () {
var device_id = 'tessel-01';
var password = 'THE TESSEL PASSWORD';
authenticate(device_id, password, function(e,token){
if(e) return console.log("Error:" + e);
getDeviceProfile(token.access_token, function(e, profile){
console.log("Device profile:");
console.log(profile);
});
});
function getDeviceProfile(token, done){
request('{yourDomain}',
'/userinfo',
'GET',
{
"Content-type": "application/json",
"Authorization": "Bearer " + token
},
null,
function(e,response){
if(e) return done(e);
done(null, JSON.parse(response));
});
}
function authenticate(device_id, password, done)
{
request('{yourDomain}',
'/oauth/ro',
'POST',
{
"Content-type": "application/json",
},
JSON.stringify({
client_id: '{yourClientId}',
username: device_id,
password: password,
connection: 'devices',
grant_type: "password",
scope: 'openid'
}),
function(e,response){
if(e) return done(e);
done(null, JSON.parse(response));
});
}
function request(host, path, method, headers, body, done){
var options = {
hostname: host,
path: path,
method: method,
headers: headers
};
var req = http.request(options, function(res) {
res.setEncoding('utf8');
var response = "";
res.on('data', function (chunk) {
response += chunk;
});
res.on('end', function(){
done(null, response);
});
});
req.on('error', function(e) {
done(e);
});
if( body ) req.write(body);
req.end();
}
});`;
Noteworthy highlights of the code:
1. This is 99% compatible with Node (the only device specific module.is `tessel` that we only use to make sure all SSL calls happen with adequate time references.
2. The `request` function, is a simple wrapper on `http` module functions. The `request` module doesn't currently work in Tessel.
The Resource Owner endpoint requires credentials (such as username/password), so the backend user store connected to Auth0 needs to support this (like a Database connection or Active Directory).
## Tessel Setup
* Run `tessel update` to make sure you install the latest firmware with SSL support.
* You will obviously need connection to the web. You can set up WiFi with the `tessel wifi` command.
* Always send credentials (such as `username`/`password`) over secured networks.
## Summary
Tessel is awesome. We see a lot of potential. This sample shows how easy it is to connect it with Auth0.
export const codeExample = `var http = require('https');
var tessel = require('tessel');
tessel.syncClock(function () {
var device_id = 'tessel-01';
var password = 'THE TESSEL PASSWORD';
authenticate(device_id, password, function(e,token){
if(e) return console.log("Error:" + e);
getDeviceProfile(token.access_token, function(e, profile){
console.log("Device profile:");
console.log(profile);
});
});
function getDeviceProfile(token, done){
request('{yourDomain}',
'/userinfo',
'GET',
{
"Content-type": "application/json",
"Authorization": "Bearer " + token
},
null,
function(e,response){
if(e) return done(e);
done(null, JSON.parse(response));
});
}
function authenticate(device_id, password, done)
{
request('{yourDomain}',
'/oauth/ro',
'POST',
{
"Content-type": "application/json",
},
JSON.stringify({
client_id: '{yourClientId}',
username: device_id,
password: password,
connection: 'devices',
grant_type: "password",
scope: 'openid'
}),
function(e,response){
if(e) return done(e);
done(null, JSON.parse(response));
});
}
function request(host, path, method, headers, body, done){
var options = {
hostname: host,
path: path,
method: method,
headers: headers
};
var req = http.request(options, function(res) {
res.setEncoding('utf8');
var response = "";
res.on('data', function (chunk) {
response += chunk;
});
res.on('end', function(){
done(null, response);
});
});
req.on('error', function(e) {
done(e);
});
if( body ) req.write(body);
req.end();
}
});`;
Noteworthy highlights of the code:
1. This is 99% compatible with Node (the only device specific module.is `tessel` that we only use to make sure all SSL calls happen with adequate time references.
2. The `request` function, is a simple wrapper on `http` module functions. The `request` module doesn't currently work in Tessel.
The Resource Owner endpoint requires credentials (such as username/password), so the backend user store connected to Auth0 needs to support this (like a Database connection or Active Directory).
## Tessel Setup
* Run `tessel update` to make sure you install the latest firmware with SSL support.
* You will obviously need connection to the web. You can set up WiFi with the `tessel wifi` command.
* Always send credentials (such as `username`/`password`) over secured networks.
## Summary
Tessel is awesome. We see a lot of potential. This sample shows how easy it is to connect it with Auth0.