> ## Documentation Index
> Fetch the complete documentation index at: https://docs-dev-actions-triggers-prototype.mintlify.site/llms.txt
> Use this file to discover all available pages before exploring further.
> Call a social or enterprise identity provider's API from your Auth0 application using the upstream access token Auth0 stored after the user log in.
# Call an Identity Provider API
export const AuthCodeGroup = ({children, dropdown}) => {
const [processedChildren, setProcessedChildren] = useState(children);
useEffect(() => {
let unsubscribe = null;
function init() {
unsubscribe = window.autorun(() => {
const processChildren = node => {
if (typeof node === "string") {
let processedNode = node;
for (const [key, value] of window.rootStore.variableStore.values.entries()) {
const escapedKey = key.replaceAll(/[.*+?^${}()|[\]\\]/g, (String.raw)`\$&`);
processedNode = processedNode.replaceAll(new RegExp(escapedKey, "g"), value);
}
return processedNode;
} else if (Array.isArray(node)) {
return node.map(processChildren);
} else if (node && node.props && node.props.children) {
return {
...node,
props: {
...node.props,
children: processChildren(node.props.children)
}
};
}
return node;
};
setProcessedChildren(processChildren(children));
});
}
if (window.rootStore) {
init();
} else {
window.addEventListener("adu:storeReady", init);
}
return () => {
window.removeEventListener("adu:storeReady", init);
unsubscribe?.();
};
}, [children]);
return {processedChildren};
};
export const AuthCodeBlock = ({filename, icon, language, highlight, children}) => {
const [displayText, setDisplayText] = useState(children);
const [copyText, setCopyText] = useState(children);
const wrapperRef = React.useRef(null);
useEffect(() => {
let unsubscribe = null;
function init() {
if (!window.autorun || !window.rootStore) {
return;
}
unsubscribe = window.autorun(() => {
let processedChildrenForDisplay = children;
let processedChildrenForCopy = children;
for (const [key, value] of window.rootStore.variableStore.values.entries()) {
const escapedKey = key.replaceAll(/[.*+?^${}()|[\]\\]/g, (String.raw)`\$&`);
let displayValue = value;
if (key === "{yourClientSecret}" && value !== "{yourClientSecret}") {
displayValue = value.substring(0, 3) + "*****MASKED*****";
}
processedChildrenForDisplay = processedChildrenForDisplay.replaceAll(new RegExp(escapedKey, "g"), displayValue);
processedChildrenForCopy = processedChildrenForCopy.replaceAll(new RegExp(escapedKey, "g"), value);
}
setDisplayText(processedChildrenForDisplay);
setCopyText(processedChildrenForCopy);
});
}
if (window.rootStore) {
init();
} else {
window.addEventListener("adu:storeReady", init);
}
return () => {
window.removeEventListener("adu:storeReady", init);
unsubscribe?.();
};
}, [children]);
useEffect(() => {
if (!wrapperRef.current) return;
const originalWriteText = navigator.clipboard.writeText.bind(navigator.clipboard);
let isOverriding = false;
const handleClick = e => {
const button = e.target.closest('[data-testid="copy-code-button"]');
if (!button || !wrapperRef.current.contains(button)) return;
isOverriding = true;
navigator.clipboard.writeText = text => {
if (isOverriding) {
isOverriding = false;
navigator.clipboard.writeText = originalWriteText;
return originalWriteText(copyText);
}
return originalWriteText(text);
};
setTimeout(() => {
if (isOverriding) {
isOverriding = false;
navigator.clipboard.writeText = originalWriteText;
}
}, 100);
};
const wrapper = wrapperRef.current;
wrapper.addEventListener('click', handleClick, true);
return () => {
wrapper.removeEventListener('click', handleClick, true);
if (navigator.clipboard.writeText !== originalWriteText) {
navigator.clipboard.writeText = originalWriteText;
}
};
}, [copyText]);
return
{displayText}
;
};
If you have [Token Vault](/docs/secure/tokens/token-vault) enabled for your connection, access and refresh tokens will no longer be stored in the user’s `identities` array. Instead, they will be stored in a secure tokenset within the Token Vault. To enable Token Vault, read [Configure Token Vault](/docs/secure/tokens/token-vault/configure-token-vault).
Once you successfully authenticate a user with an external Identity Provider (IdP), such as Facebook or GitHub, the IdP often includes an access token in the user profile it returns to Auth0.
You can retrieve and use this token to call the IdP's API.
This article assumes that you have already configured the connection with the IdP of your choice. If not, go to [Identity Providers Supported by Auth0](/docs/authenticate/identity-providers/social-identity-providers), select the IdP you want, and follow the configuration steps.
The process you will follow differs depending on whether your code runs in the backend or the frontend:
* If your code runs in the backend, then we can assume that your server is trusted to safely store secrets (as you will see, we use a secret in the backend scenario). If that's the case, proceed to the [backend section](#from-the-backend) of this article.
* If your code runs in the frontend (for example, it's a SPA, native desktop, or mobile app), then your app cannot hold credentials securely and has to follow an alternate approach. In this case, proceed to the [frontend section](#from-the-frontend) of this article.
## From the backend
Once you authenticate a user, the IdP often includes an Access Token in the user profile it returns to Auth0.
For security and compliance reasons, Auth0 does not send this token to your app as part of the user profile. To get it, you must access the Auth0 Management API and retrieve the full user's profile:
1. Get an Access Token that allows you to call the [Auth0 Management API](https://auth0.com/docs/api/management/v2).
2. Call the Auth0 Management API's [Get Users by ID endpoint](https://auth0.com/docs/api/management/v2#!/Users/get_users_by_id) using the Access Token obtained in step one. This endpoint returns the full user's profile, which contains the IdP Access Token.
3. Extract the IdP Access Token from the response and use it to call the IdP's API.
### Step 1: Get a Token
You will need an Access Token to call the [Management API](https://auth0.com/docs/api/management/v2).
#### Create a test application for the Management API
If this is the first time you are requesting a [Management APIv2 Token](https://auth0.com/docs/api/management/v2/tokens), you will need to create and configure an application that can be used to call the Management API:
1. Navigate to [Auth0 Dashboard > Applications > APIs](https://manage.auth0.com/#/apis), and select the [Auth0 Management API](https://manage.auth0.com/#/apis/management/authorized-clients).
2. Select the **API Explorer** view, and click **Create & Authorize a Test Application**.
This will create a new application and grant all scopes of the Management API, which means that the tokens generated for this application will be able to access all Management API endpoints.
If you don't see this button, it means that you already have at least one authorized application for the Management API. In this case, you can either update the scopes of the existing application and use that, or create a new one following these steps:
1. Navigate to [Auth0 Dashboard > Applications > Applications](https://manage.auth0.com/#/applications), and select **Create Application**.
2. Select **Machine to Machine Applications**, and then **Create**.
3. From the **Select an API** dropdown, select `Auth0 Management API`.
4. Enable required scopes, and select **Authorize**.
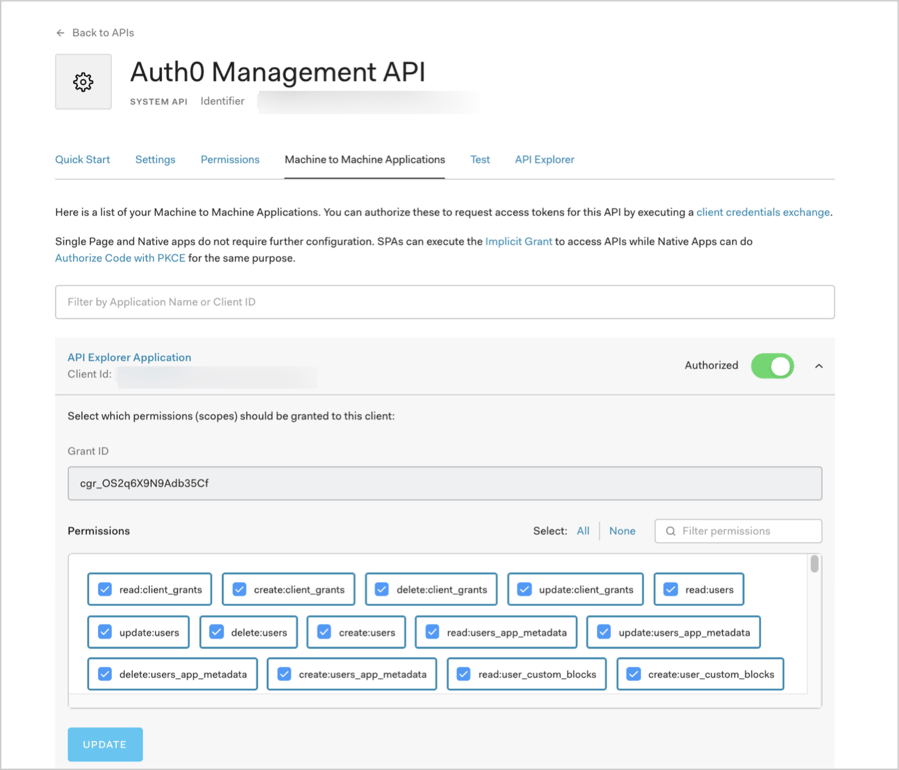
5. Select the **APIs** view, and enable the toggle for **Auth0 Management API**.
For security reasons, we recommend that you assign only the required scopes to the application you will be using. For this particular case, the scopes you need are: `read:users`, `read:user_idp_tokens`. Required scopes are listed for each endpoint in the [Management API Explorer](https://auth0.com/docs/api/management/v2).
To grant or remove scopes from the [registered Auth0 Management API](https://manage.auth0.com/#/apis/management/authorized-clients), select the [**Machine to Machine Applications** view](https://manage.auth0.com/#/apis/management/authorized-clients):
 #### Get the Management API Token
You are now done with configuration and are ready to get your Management API token:
1. From the [registered Auth0 Management API](https://manage.auth0.com/#/apis/management/authorized-clients), select the [**Test** view](https://manage.auth0.com/#/apis/management/test).
2. Choose your application from the **Application** dropdown to pre-populate the ready-to-use snippets with customized variables.
3. Choose your language of preference for the snippet, and copy and run it.
4. Extract the `access_token` property from the response. This is what you will use to access the Management API.
The snippets make a `POST` operation to the [/oauth/token endpoint of the Auth0 Authentication API](https://auth0.com/docs/api/authentication#client-credentials), using the **OAuth 2.0 Client Credentials grant**. This is the grant that machine-to-machine processes use to access an API. To learn more about the flow, read [Client Credentials Flow](/docs/get-started/authentication-and-authorization-flow/client-credentials-flow).
#### Token expiration
By default, the token you received expires in 24 hours (86,400 seconds). To change this:
1. Navigate to [Auth0 Dashboard > Applications > APIs](https://manage.auth0.com/#/apis), and select the [Auth0 Management API](https://manage.auth0.com/#/apis/management/authorized-clients).
2. Select the **Settings** view, locate the **Token Expiration (Seconds)** field, enter a new value, and click **Save**. The maximum value you can set is 2,592,000 seconds (30 days), though we recommend that you keep the default value.
The next token you generate will use the updated expiration time.
These tokens **cannot be revoked**. To minimize risk, we recommend issuing short-lived tokens and granting only the necessary scopes for each application. For a production environment, you can configure a simple CLI that will fetch a new token when the old one expires.
### Step 2: Get the full User Profile
To get a user's profile, call the [Get a User endpoint](https://auth0.com/docs/api/management/v2#!/Users/get_users_by_id) of the Management API using the Access Token you extracted in the previous section:
```bash cURL theme={null}
curl --request GET \
--url 'https://{yourDomain}/api/v2/users/%7BuserId%7D' \
--header 'authorization: Bearer {yourAccessToken}'
```
```csharp C# theme={null}
var client = new RestClient("https://{yourDomain}/api/v2/users/%7BuserId%7D");
var request = new RestRequest(Method.GET);
request.AddHeader("authorization", "Bearer {yourAccessToken}");
IRestResponse response = client.Execute(request);
```
```go Go theme={null}
package main
import (
"fmt"
"net/http"
"io/ioutil"
)
func main() {
url := "https://{yourDomain}/api/v2/users/%7BuserId%7D"
req, _ := http.NewRequest("GET", url, nil)
req.Header.Add("authorization", "Bearer {yourAccessToken}")
res, _ := http.DefaultClient.Do(req)
defer res.Body.Close()
body, _ := ioutil.ReadAll(res.Body)
fmt.Println(res)
fmt.Println(string(body))
}
```
```java Java theme={null}
HttpResponse response = Unirest.get("https://{yourDomain}/api/v2/users/%7BuserId%7D")
.header("authorization", "Bearer {yourAccessToken}")
.asString();
```
```javascript Node.JS theme={null}
var axios = require("axios").default;
var options = {
method: 'GET',
url: 'https://{yourDomain}/api/v2/users/%7BuserId%7D',
headers: {authorization: 'Bearer {yourAccessToken}'}
};
axios.request(options).then(function (response) {
console.log(response.data);
}).catch(function (error) {
console.error(error);
});
```
```php PHP theme={null}
$curl = curl_init();
curl_setopt_array($curl, [
CURLOPT_URL => "https://{yourDomain}/api/v2/users/%7BuserId%7D",
CURLOPT_RETURNTRANSFER => true,
CURLOPT_ENCODING => "",
CURLOPT_MAXREDIRS => 10,
CURLOPT_TIMEOUT => 30,
CURLOPT_HTTP_VERSION => CURL_HTTP_VERSION_1_1,
CURLOPT_CUSTOMREQUEST => "GET",
CURLOPT_HTTPHEADER => [
"authorization: Bearer {yourAccessToken}"
],
]);
$response = curl_exec($curl);
$err = curl_error($curl);
curl_close($curl);
if ($err) {
echo "cURL Error #:" . $err;
} else {
echo $response;
}
```
```python Python theme={null}
import http.client
conn = http.client.HTTPSConnection("")
headers = { 'authorization': "Bearer {yourAccessToken}" }
conn.request("GET", "/{yourDomain}/api/v2/users/%7BuserId%7D", headers=headers)
res = conn.getresponse()
data = res.read()
print(data.decode("utf-8"))
```
```ruby Ruby theme={null}
require 'uri'
require 'net/http'
require 'openssl'
url = URI("https://{yourDomain}/api/v2/users/%7BuserId%7D")
http = Net::HTTP.new(url.host, url.port)
http.use_ssl = true
http.verify_mode = OpenSSL::SSL::VERIFY_NONE
request = Net::HTTP::Get.new(url)
request["authorization"] = 'Bearer {yourAccessToken}'
response = http.request(request)
puts response.read_body
```
Replace these values:
* `{userId}`: ID of the user for whom you want to call the IdP's API.
* `{yourAccessToken}`: Access Token you extracted in the previous section.
- For testing purposes, you can find a user ID at [Auth0 Dashboard > User Management > Users](https://manage.auth0.com/#/users). Locate a user, and copy the value of the **user\_id** field.
- For your implementation, you can either extract the user ID from the `sub` claim in the [ID Token](/docs/secure/tokens/id-tokens), or call the [/userinfo endpoint](https://auth0.com/docs/api/authentication#get-user-info) of the Authentication API and extract it from the `user_id` response property.
### Step 3: Extract the IdP Access Token
You can find the Access Token used to call the IdP's API within the user's `identities` array: `user.identities[0].access_token`.
For certain Identity Providers, Auth0 will also store a Refresh Token, which you can use to obtain a new Access Token for the IdP. This works for: BitBucket, Google (OAuth 2.0), OAuth 2.0, SharePoint, and Azure AD. To learn more, read [Identity Provider Access Tokens](/docs/secure/tokens/access-tokens/identity-provider-access-tokens).
In most cases, the user will only have one identity, but if the user has signed in multiple times through different connections and you have used [account linking](/docs/manage-users/user-accounts/user-account-linking/link-user-accounts), there may be more.
In this sample response, we see that our user has only one identity: `google-oauth2`.
```json lines expandable theme={null}
{
"email": "john.doe@test.com",
"email_verified": true,
"name": "John Doe",
"given_name": "John",
"family_name": "Doe",
"picture": "https://myavatar/photo.jpg",
"gender": "male",
"locale": "en",
"updated_at": "2017-03-15T07:14:32.451Z",
"user_id": "google-oauth2|111199914890750704174",
"nickname": "john.doe",
"identities": [
{
"provider": "google-oauth2",
"access_token": "ya29.GlsPBCS6ahokDlgCYnVLnDKNE71HBXPEzNhAPoKJLAGKDSe1De3_xclahNcdZXoU-26hCpa8h6240TV86dtaEQ4ZWoeeZduHDq_yeu9QyQqUr--S9B2CR9YJrLTD",
"expires_in": 3599,
"user_id": "111199914890750704174",
"connection": "google-oauth2",
"isSocial": true
}
],
"created_at": "2017-03-15T07:13:41.134Z",
"last_ip": "127.0.0.1",
"last_login": "2017-03-15T07:14:32.451Z",
"logins_count": 99
}
```
You are now ready to call the IdP's API. Please refer to the IdP's documentation for specifics on how to do so.
Don't expose IdP tokens to your client-side application! If your application is public, see the [frontend section](#from-the-frontend) of this article.
To learn more about how to request specific scopes for an Identity Provider Access Token, read [Add scopes/permissions to call Identity Provider's APIs](/docs/authenticate/identity-providers/adding-scopes-for-an-external-idp).
## From the frontend
If you are working with a public application (SPA, native desktop, or mobile app), then this is the place to be.
When working with a frontend app, the process for calling IdP APIs differs from the backend process because frontend apps are public applications that **cannot hold credentials securely**. Because SPA code can be viewed and altered, and native/mobile apps can be decompiled and inspected, they cannot be trusted to hold sensitive information like secret keys or passwords.
Specifically, they cannot securely hold the **Client Secret** for the Machine to Machine Application, which you use to call `/oauth/token` during the first step of the backend process.
Instead, you must build a proxy for your backend and expose it to your application as an API.
### Build a proxy
First, you will build a process in your backend that will implement the steps included in [the backend section](#from-the-backend) of this article, and expose it to your application as an API.
You will call the IdP's API from the same backend process, so the Access Token is never exposed to your public application.
Then, you will call your proxy API from your public application using the [Authorization Code Flow with Proof Key for Code Exchange (PKCE)](/docs/get-started/authentication-and-authorization-flow/authorization-code-flow-with-pkce).
If you haven't implemented this before, you might find our [Single-page Applications (SPA) with API](/docs/get-started/architecture-scenarios/spa-api) architecture scenario useful. It covers a different scenario, but it explains how to configure Auth0, how to call an API from a SPA, and how to implement API validations. It comes with a sample that uses [Angular 2](https://github.com/auth0-samples/auth0-pnp-exampleco-timesheets/tree/master/timesheets-spa/angular) and [Node.js](https://github.com/auth0-samples/auth0-pnp-exampleco-timesheets/tree/master/timesheets-api/node).
We also offer a [Mobile Applications with API](/docs/get-started/architecture-scenarios/mobile-api) variation (the sample uses [Android](https://github.com/auth0-samples/auth0-pnp-exampleco-timesheets/tree/master/timesheets-mobile/android) and [Node.js](https://github.com/auth0-samples/auth0-pnp-exampleco-timesheets/tree/master/timesheets-api/node)).
#### Get the Management API Token
You are now done with configuration and are ready to get your Management API token:
1. From the [registered Auth0 Management API](https://manage.auth0.com/#/apis/management/authorized-clients), select the [**Test** view](https://manage.auth0.com/#/apis/management/test).
2. Choose your application from the **Application** dropdown to pre-populate the ready-to-use snippets with customized variables.
3. Choose your language of preference for the snippet, and copy and run it.
4. Extract the `access_token` property from the response. This is what you will use to access the Management API.
The snippets make a `POST` operation to the [/oauth/token endpoint of the Auth0 Authentication API](https://auth0.com/docs/api/authentication#client-credentials), using the **OAuth 2.0 Client Credentials grant**. This is the grant that machine-to-machine processes use to access an API. To learn more about the flow, read [Client Credentials Flow](/docs/get-started/authentication-and-authorization-flow/client-credentials-flow).
#### Token expiration
By default, the token you received expires in 24 hours (86,400 seconds). To change this:
1. Navigate to [Auth0 Dashboard > Applications > APIs](https://manage.auth0.com/#/apis), and select the [Auth0 Management API](https://manage.auth0.com/#/apis/management/authorized-clients).
2. Select the **Settings** view, locate the **Token Expiration (Seconds)** field, enter a new value, and click **Save**. The maximum value you can set is 2,592,000 seconds (30 days), though we recommend that you keep the default value.
The next token you generate will use the updated expiration time.
These tokens **cannot be revoked**. To minimize risk, we recommend issuing short-lived tokens and granting only the necessary scopes for each application. For a production environment, you can configure a simple CLI that will fetch a new token when the old one expires.
### Step 2: Get the full User Profile
To get a user's profile, call the [Get a User endpoint](https://auth0.com/docs/api/management/v2#!/Users/get_users_by_id) of the Management API using the Access Token you extracted in the previous section:
```bash cURL theme={null}
curl --request GET \
--url 'https://{yourDomain}/api/v2/users/%7BuserId%7D' \
--header 'authorization: Bearer {yourAccessToken}'
```
```csharp C# theme={null}
var client = new RestClient("https://{yourDomain}/api/v2/users/%7BuserId%7D");
var request = new RestRequest(Method.GET);
request.AddHeader("authorization", "Bearer {yourAccessToken}");
IRestResponse response = client.Execute(request);
```
```go Go theme={null}
package main
import (
"fmt"
"net/http"
"io/ioutil"
)
func main() {
url := "https://{yourDomain}/api/v2/users/%7BuserId%7D"
req, _ := http.NewRequest("GET", url, nil)
req.Header.Add("authorization", "Bearer {yourAccessToken}")
res, _ := http.DefaultClient.Do(req)
defer res.Body.Close()
body, _ := ioutil.ReadAll(res.Body)
fmt.Println(res)
fmt.Println(string(body))
}
```
```java Java theme={null}
HttpResponse response = Unirest.get("https://{yourDomain}/api/v2/users/%7BuserId%7D")
.header("authorization", "Bearer {yourAccessToken}")
.asString();
```
```javascript Node.JS theme={null}
var axios = require("axios").default;
var options = {
method: 'GET',
url: 'https://{yourDomain}/api/v2/users/%7BuserId%7D',
headers: {authorization: 'Bearer {yourAccessToken}'}
};
axios.request(options).then(function (response) {
console.log(response.data);
}).catch(function (error) {
console.error(error);
});
```
```php PHP theme={null}
$curl = curl_init();
curl_setopt_array($curl, [
CURLOPT_URL => "https://{yourDomain}/api/v2/users/%7BuserId%7D",
CURLOPT_RETURNTRANSFER => true,
CURLOPT_ENCODING => "",
CURLOPT_MAXREDIRS => 10,
CURLOPT_TIMEOUT => 30,
CURLOPT_HTTP_VERSION => CURL_HTTP_VERSION_1_1,
CURLOPT_CUSTOMREQUEST => "GET",
CURLOPT_HTTPHEADER => [
"authorization: Bearer {yourAccessToken}"
],
]);
$response = curl_exec($curl);
$err = curl_error($curl);
curl_close($curl);
if ($err) {
echo "cURL Error #:" . $err;
} else {
echo $response;
}
```
```python Python theme={null}
import http.client
conn = http.client.HTTPSConnection("")
headers = { 'authorization': "Bearer {yourAccessToken}" }
conn.request("GET", "/{yourDomain}/api/v2/users/%7BuserId%7D", headers=headers)
res = conn.getresponse()
data = res.read()
print(data.decode("utf-8"))
```
```ruby Ruby theme={null}
require 'uri'
require 'net/http'
require 'openssl'
url = URI("https://{yourDomain}/api/v2/users/%7BuserId%7D")
http = Net::HTTP.new(url.host, url.port)
http.use_ssl = true
http.verify_mode = OpenSSL::SSL::VERIFY_NONE
request = Net::HTTP::Get.new(url)
request["authorization"] = 'Bearer {yourAccessToken}'
response = http.request(request)
puts response.read_body
```
Replace these values:
* `{userId}`: ID of the user for whom you want to call the IdP's API.
* `{yourAccessToken}`: Access Token you extracted in the previous section.
- For testing purposes, you can find a user ID at [Auth0 Dashboard > User Management > Users](https://manage.auth0.com/#/users). Locate a user, and copy the value of the **user\_id** field.
- For your implementation, you can either extract the user ID from the `sub` claim in the [ID Token](/docs/secure/tokens/id-tokens), or call the [/userinfo endpoint](https://auth0.com/docs/api/authentication#get-user-info) of the Authentication API and extract it from the `user_id` response property.
### Step 3: Extract the IdP Access Token
You can find the Access Token used to call the IdP's API within the user's `identities` array: `user.identities[0].access_token`.
For certain Identity Providers, Auth0 will also store a Refresh Token, which you can use to obtain a new Access Token for the IdP. This works for: BitBucket, Google (OAuth 2.0), OAuth 2.0, SharePoint, and Azure AD. To learn more, read [Identity Provider Access Tokens](/docs/secure/tokens/access-tokens/identity-provider-access-tokens).
In most cases, the user will only have one identity, but if the user has signed in multiple times through different connections and you have used [account linking](/docs/manage-users/user-accounts/user-account-linking/link-user-accounts), there may be more.
In this sample response, we see that our user has only one identity: `google-oauth2`.
```json lines expandable theme={null}
{
"email": "john.doe@test.com",
"email_verified": true,
"name": "John Doe",
"given_name": "John",
"family_name": "Doe",
"picture": "https://myavatar/photo.jpg",
"gender": "male",
"locale": "en",
"updated_at": "2017-03-15T07:14:32.451Z",
"user_id": "google-oauth2|111199914890750704174",
"nickname": "john.doe",
"identities": [
{
"provider": "google-oauth2",
"access_token": "ya29.GlsPBCS6ahokDlgCYnVLnDKNE71HBXPEzNhAPoKJLAGKDSe1De3_xclahNcdZXoU-26hCpa8h6240TV86dtaEQ4ZWoeeZduHDq_yeu9QyQqUr--S9B2CR9YJrLTD",
"expires_in": 3599,
"user_id": "111199914890750704174",
"connection": "google-oauth2",
"isSocial": true
}
],
"created_at": "2017-03-15T07:13:41.134Z",
"last_ip": "127.0.0.1",
"last_login": "2017-03-15T07:14:32.451Z",
"logins_count": 99
}
```
You are now ready to call the IdP's API. Please refer to the IdP's documentation for specifics on how to do so.
Don't expose IdP tokens to your client-side application! If your application is public, see the [frontend section](#from-the-frontend) of this article.
To learn more about how to request specific scopes for an Identity Provider Access Token, read [Add scopes/permissions to call Identity Provider's APIs](/docs/authenticate/identity-providers/adding-scopes-for-an-external-idp).
## From the frontend
If you are working with a public application (SPA, native desktop, or mobile app), then this is the place to be.
When working with a frontend app, the process for calling IdP APIs differs from the backend process because frontend apps are public applications that **cannot hold credentials securely**. Because SPA code can be viewed and altered, and native/mobile apps can be decompiled and inspected, they cannot be trusted to hold sensitive information like secret keys or passwords.
Specifically, they cannot securely hold the **Client Secret** for the Machine to Machine Application, which you use to call `/oauth/token` during the first step of the backend process.
Instead, you must build a proxy for your backend and expose it to your application as an API.
### Build a proxy
First, you will build a process in your backend that will implement the steps included in [the backend section](#from-the-backend) of this article, and expose it to your application as an API.
You will call the IdP's API from the same backend process, so the Access Token is never exposed to your public application.
Then, you will call your proxy API from your public application using the [Authorization Code Flow with Proof Key for Code Exchange (PKCE)](/docs/get-started/authentication-and-authorization-flow/authorization-code-flow-with-pkce).
If you haven't implemented this before, you might find our [Single-page Applications (SPA) with API](/docs/get-started/architecture-scenarios/spa-api) architecture scenario useful. It covers a different scenario, but it explains how to configure Auth0, how to call an API from a SPA, and how to implement API validations. It comes with a sample that uses [Angular 2](https://github.com/auth0-samples/auth0-pnp-exampleco-timesheets/tree/master/timesheets-spa/angular) and [Node.js](https://github.com/auth0-samples/auth0-pnp-exampleco-timesheets/tree/master/timesheets-api/node).
We also offer a [Mobile Applications with API](/docs/get-started/architecture-scenarios/mobile-api) variation (the sample uses [Android](https://github.com/auth0-samples/auth0-pnp-exampleco-timesheets/tree/master/timesheets-mobile/android) and [Node.js](https://github.com/auth0-samples/auth0-pnp-exampleco-timesheets/tree/master/timesheets-api/node)).